-
[Swift] Drag&Drop Interaction CustomValue 전달개발/Swift 2022. 5. 2. 15:22반응형
요구사항
- 뷰는 UIViewController 와 UITableView가있다.
- UITableView에 있는 아이콘을 드래그하여 UIview에 드랍해야한다.
- 드래그 → 드랍 과정에서 데이터가 오가야한다. (Model)
- UIView 에 드랍이 되면 UITableView에 있는 아이콘을 드랍하는게 아니라 다른 View를 그려야한다.
일반적인 Drag & Drop 은 UIImage를 전달한다.
하지만 요구사항에 충족하려면 UIImage를 전달해서는 안된다. 어떤 데이터를 받고 그 데이터를 기반으로 새로운 View를 그려야한다.
그러려면 전달하려는 데이터의 클래스(타입)이 ``NSItemProviderReading , NSItemProviderWriting 을 상속하면 된다. 그렇지 않으면 dropSession에서 해당 클래스를 Load 하지 못한다.
CustomModule 이라는 타입을 만들었다.
내부 변수로는 CustomModuleType라는 enum 타입을 두었다.
enum 타입을 변수로 두려면
해당 enum 타입도 Codable 을 상속 해야한다.
String 같은 기본타입은 그냥 넣어주면 된다.
final class CustomModule : NSObject , NSItemProviderWriting , Codable,NSItemProviderReading {

    let type : CustomModuleType

    init(type:CustomModuleType) {
        self.type = type
    }

    static var writableTypeIdentifiersForItemProvider: [String] {
        return [String(kUTTypeData)]
    }

    func loadData(withTypeIdentifier typeIdentifier: String, forItemProviderCompletionHandler completionHandler: @escaping (Data?, Error?) -> Void) -> Progress? {
        let progress = Progress(totalUnitCount: 100)
            do {
                let data = try JSONEncoder().encode(self)
                progress.completedUnitCount = 100
                completionHandler(data, nil)
            } catch {
                completionHandler(nil, error)
            }
            return progress
    }
    static var readableTypeIdentifiersForItemProvider: [String] {
           return [String(kUTTypeData)]
       }

    static func object(withItemProviderData data: Data, typeIdentifier: String) throws -> CustomModule {
       do {
           let subject = try JSONDecoder().decode(CustomModule.self, from: data)
           return subject
       } catch {
           fatalError()
       }
    }


}

enum CustomModuleType : Codable {

    case Button
    case Switch

    enum ErrorType: Error {
            case encoding
            case decoding
        }
    init(from decoder: Decoder) throws {
        let value = try decoder.singleValueContainer()
        let decodedValue = try value.decode(String.self)
        switch decodedValue {
        case "button":
            self = .Button
        case "switch":
            self = .Switch

        default:
            throw ErrorType.decoding
        }
    }


    func encode(to encoder: Encoder) throws {
        var container = try encoder.singleValueContainer()
        switch self {
        case .Button:
            try container.encode("button")
        case .Switch:
            try container.encode("switch")
        }
    }
}
NSItemProviderWriting ,NSItemProviderReading 을 상속하면 저 위의 함수들을 구현해줘야하는데
내부의 내용은 이해하지못한다. 단지 read / write 를 하는데 필요한 encoding / decoding 작업을 해주는거로 판단된다. 커스텀 클래스를 사용하려면 위 코드를 그대로 사용해도 된다.
우선 드래그가 시작될 TableView를 담은 ViewController 에서
UITableViewDragDelegate,UITableViewDropDelegate 를 상속받아 줘야 Drag / Drop 이벤트가 가능해진다.
테이블 뷰에서는 해당 moduleList를 보고 cell들을 그렸다
let modulelist = [CustomModule(type: .Button) , CustomModule(type: .Switch)]

func tableView(_ tableView: UITableView, numberOfRowsInSection section: Int) -> Int {
        modulelist.count
    }

    func tableView(_ tableView: UITableView, cellForRowAt indexPath: IndexPath) -> UITableViewCell {
        guard let cell = tableView.dequeueReusableCell(withIdentifier: "CustomModuleListTableViewCell", for: indexPath) as? CustomModuleListTableViewCell else{ fatalError("cell error")}
        let image = getImage(type: modulelist[indexPath.row].type)
        cell.moduleImageView.image = image
        return cell
    }

    private func getImage(type:CustomModuleType) -> UIImage?{
       switch type {
       case .Button:
           return UIImage(named: "lineBtn")
       case .Switch:
           return UIImage(named: "lineSwitch")
       default:
           return UIImage()
       }
   }
Drag & Drop으로 데이터를 전달할건데
CustomModule(type: .Button) 라는 객체를 전달 해줄것이다.
func tableView(_ tableView: UITableView, itemsForBeginning session: UIDragSession, at indexPath: IndexPath) -> [UIDragItem] {
        print("itemsForBeginning")
        let module = modulelist[indexPath.row]
        let provider = NSItemProvider(object: module)
        return [UIDragItem(itemProvider: provider)]
    }
전달할 객체를 NSItemProvider 에 담아
UIDragItem에 넣어 리턴해주었다.
이제 드래그 이벤트가 실행되었다.
여기서부터는 별도의 작업을 해주지않아도 테이블뷰에서 시작된 DragItem을
드랍할 위치에있는 UIViewController에서 Drop을 받을수있다.
드랍을 받은 UIViewController에서도(앞으로 DropViewController라 칭한다)
DropDelegate를 상속받아주었다.
만약 DropViewController 위치에 드래그 할 아이템이 오면 해당 함수가 한번 실행된다.
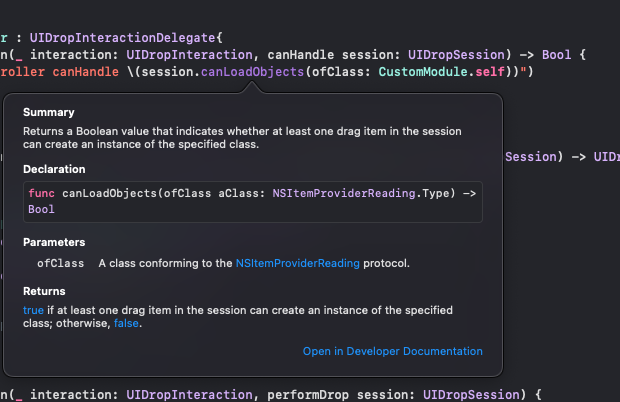
func dropInteraction(_ interaction: UIDropInteraction, canHandle session: UIDropSession) -> Bool {

        return session.canLoadObjects(ofClass: CustomModule.self)
    }
CustomModule 이라는 타입을 Load할수 있는지 체크한다 true인경우 다음 로직이 실행되고
아니면 이후 로직이 모두 cancel 된다. 즉 true가 나와야 Drop이 가능하다.
True라면 다음 로직이 실행된다. 아래 함수는 DragItem의 위치가 변경될때마다 호출된다.
func dropInteraction(_ interaction: UIDropInteraction, sessionDidUpdate session: UIDropSession) -> UIDropProposal {

        if customModuleListVC.moduleListTableView.hasActiveDrag {
            return UIDropProposal(operation: .copy)
        }else{
            return UIDropProposal(operation: .move)

        }

    }
session 을 제공해주는데 session에서는 위치값등 여러 정보들을 제공해준다.
상황에따라 다른 처리를 한다면 session 을사용하면 좋다.
나의 경우는 TableView에서 온 DragItem이라면 복사
해당 UIViewController 에서 온 DragItem이면 이동을 하기위해 처리했다.
이제 손을 떄면 DragItem이 드랍된다.
이시점에 해당 함수가 호출된다.
func dropInteraction(_ interaction: UIDropInteraction, performDrop session: UIDropSession) {
	session.loadObjects(ofClass: CustomModule.self) {[weak self] items in
            guard let self = self ,
                  let customModule = items.first as? CustomModule else { return }
            let location = session.location(in: self.view)
	}
}
역시 session 을 제공해준다.
session.loadObjects(ofClass: CustomModule.self) { }위 함수를 사용하여 전달받을 CustomModule 객체를 받아올수있다.
location 정보역시 받아왔다.
이제 해당 정보에 따라 원하는 View를 그려주면 된다.
func dropInteraction(_ interaction: UIDropInteraction, performDrop session: UIDropSession) { session.loadObjects(ofClass: CustomModule.self) {[weak self] items in guard let self = self , let customModule = items.first as? CustomModule else { return } let location = session.location(in: self.view) print("type \\(customModule.type) location \\(location)") switch customModule.type { case .Button: let container = addContainer() container.snp.makeConstraints { maker in maker.width.height.equalTo(128) maker.center.equalTo(location) } self.addChildVC(CustomButtonModuleViewController(), container: container) case .Switch: let container = addContainer() container.snp.makeConstraints { maker in maker.width.equalTo(128) maker.height.equalTo(80) maker.center.equalTo(location) } self.addChildVC(CustomSwitchModuleViewController(), container: container) return } } } func addContainer() -> UIView { let container = UIView() container.backgroundColor = .white self.view.addSubview(container) return container } func addChildVC(_ childVC : UIViewController,container:UIView){ addChild(childVC) childVC.view.frame = container.bounds container.addSubview(childVC.view) childVC.willMove(toParent: self) childVC.didMove(toParent: self) }반응형'개발 > Swift' 카테고리의 다른 글
[Github Action IOS] Pod install 할때 private repo(pod) 권한 관련 에러 (0) 2022.05.16 [Swift] AssociatedType 추상클래스에서의 사용 (0) 2022.05.05 백준 1303 DFS 활용문제 (0) 2022.04.08 백준 1260 DFS 와 BFS 구현하기 (0) 2022.04.08 [Swift] 오픈채팅방 프로그래머스 (0) 2022.03.27