[Flutter basic] Listview 상품 리스트 구현하기 예제(column,row,container)

이번에 구현 해보려 하는 UI 는 위와 같은 상품 리스트 이다.
다소 복잡한 페이징은(오른쪽위 페이지 넘기는거) 제외하고
상품사진, 타이틀, Descripton으로 구성관 리스트를 구현 해보고자 한다.
보통 첫번째로 해야할 일은 모델링을 하는것이다.
그러나 API를 제공받고 있는 상황은 아니므로 모델링한 데이터들은 공유하도록 하겠다.
class ProductModel {
  const ProductModel(this.imageUrl, this.title, this.desc1, this.desc2);
  final String imageUrl;
  final String title;
  final String desc1;
  final String desc2;
}

const productList = [
  ProductModel(
      "https://www.mdockorea.com/shopimages/mdoc/0010000001762.jpg?1624588054",
      "엠도씨",
      "남성 비타민C 집중관리 앰플",
      "생기 있는 하얀 얼굴로"),
  ProductModel(
      "http://www.schneidersports.com/data/base/goods/big/SH2M1ST95_023_01.jpg?t=1625970281",
      "슈나이더 스포츠",
      "가성비 끝판! 입은거 맞아?",
      "인기 많은 흡한속건 기능티!"),
  ProductModel("http://img.mcnplaza.com/product/500/20210701just_01.jpg",
      "고려생활건강", "더위에 강한", "숨쉬기 편한 마스크"),
];
Layout 잡기
위와 같은 리스트를 레이아웃으로 잡는다면
이와 같이 잡으면 될것이다.

모두를 감싸는 container
제목과 상품 리스트를 나누는 Column
여러개의 상품을 노출하기 위한 Listview
1개의 상품을 그리는 container
그 안에 이미지와 텍스트를 나누는 row
텍스트들을 (타이틀과 설명) 나누는 Column 으로 구현이 되면 좋을것 같다.
내가 짠 코드를 보기전에 먼저 직접 요구사항을 구현 해보기를 권장한다.
첫번째 요구사항
모두를 감싸는 컨테이너에 마진20을(all) 주고
그안에 상품 리스트와(Container) 제목을(Text) 나눌 column을 구현하고
위의 사진처럼 제목은 왼쪽에 붙어야함 (추가로 텍스트 크기를 20,bold로 스타일 적용하기)
임의로 상품 리스트 Container 의 크기는 width:400, height:400으로 지정 하고 제목과 분리를 위해
top margin을 20을 준다.

body: Container(
          margin: EdgeInsets.all(20),
          color: Colors.red,
          child: Column(
            crossAxisAlignment: CrossAxisAlignment.start,
            children: [
              Text(
                "PLAY * FUN",
                style: TextStyle(fontSize: 20, fontWeight: FontWeight.bold),
              ),
              Container(
                color: Colors.blue,
                margin: EdgeInsets.only(top: 20),
                child: Text("Lists"),
                width: 400,
                height: 400,
              )
            ],
          ),
        ),
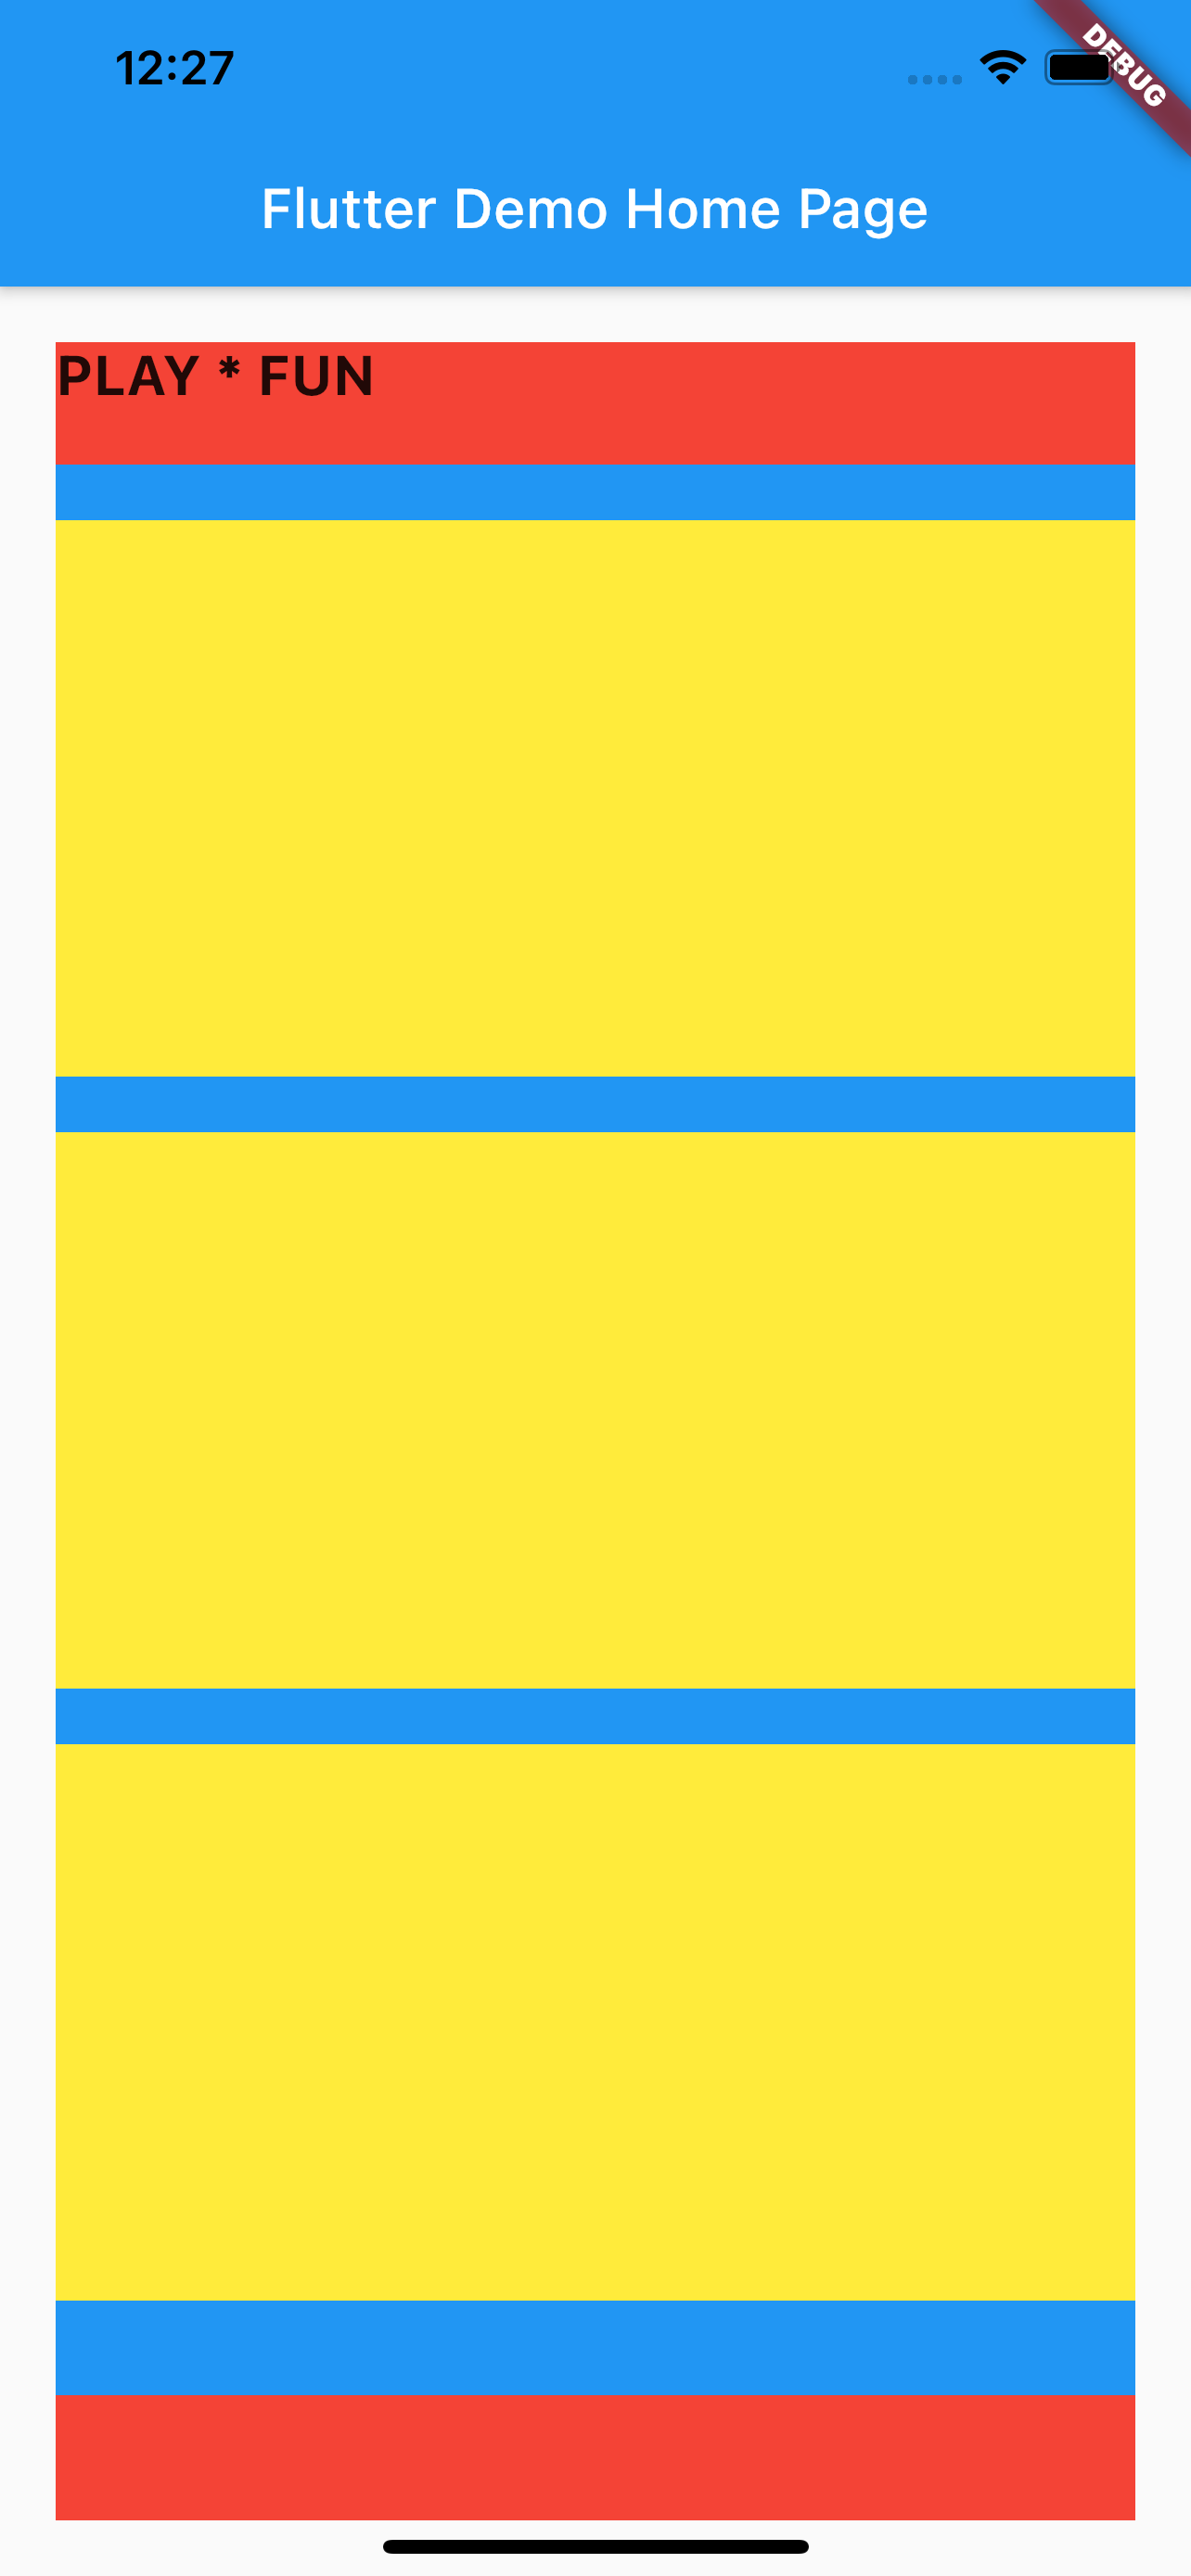
이제 리스트뷰를 데이터를 기반으로 구현할것인데
상품 리스트 UI를 아직 구현하지 않았으므로 색깔이 있는 컨테이너로 우선 그려보도록 하자.
두번쨰 요구사항
노란색 컨테이너를 데이터의 개수만큼(3개) 리스트뷰 안에 구현하기
노란색 컨테이너는 가로 400 높이 200으로 구현하고 높이 마진을 20 준다

 body: Container(
          margin: EdgeInsets.all(20),
          color: Colors.red,
          child: Column(
            crossAxisAlignment: CrossAxisAlignment.start,
            children: [
              Text(
                "PLAY * FUN",
                style: TextStyle(fontSize: 20, fontWeight: FontWeight.bold),
              ),
              Container(
                  color: Colors.blue,
                  margin: EdgeInsets.only(top: 20),
                  width: 400,
                  height: 400,
                  child: ListView.builder(
                      itemCount: productList.length,
                      itemBuilder: (BuildContext context, int index) {
                        return Container(
                          margin: EdgeInsets.only(top: 20),
                          color: Colors.yellow,
                          width: 400,
                          height: 200,
                        );
                      }))
            ],
          ),
        )
위와 같이 구현했을때 문제가 발생했다. 상품리스트Container(파란거) 의 높이가 400으로 fix 되어있어
리스트가 2개밖에 노출되지 않고 그 안에서 스크롤을 활용하여 다음 리스트를 볼수가 있다.
어차피 상품 컨테이너의(노란거) 크기가 지정되어 있으므로 부모 컨테이너의 크기는 중요하지 않다.
크기를 생략 해보자.
════════ Exception caught by rendering library ═════════════════════════════════
RenderBox was not laid out: _RenderColoredBox#00501 relayoutBoundary=up5
'package:flutter/src/rendering/box.dart':
Failed assertion: line 1930 pos 12: 'hasSize'

The relevant error-causing widget was
Container
lib/main.dart:87
그랬더니 다음과 같은 오류가 발생하며 컨테이너들이 모두 사라졌다.
리스트 뷰의 경우 부모 컨테이너의 크기와 높이가 없으면 아예 그려지지 않는다.
너비와 높이를 지정해 주면 되겠지만 상품의 갯수가 더 늘어나거나
몇개의 상품일지 모를 경우 높이 값을 알수가 없는게 문제다.
이럴떄 해결법은 다음과같다.
크기와 높이가 없는 컨테이너를 Expanded로 감싸는 방법이다.
그러면 리스트Container의 높이가 가능한만큼 늘어나서 리스트들을 모두 보여 줄수있다.
아니면 Listview안에 shrinkwrap이라는 옵션을 true로 주는 방법도 있다.

body: Container(
          margin: EdgeInsets.all(20),
          color: Colors.red,
          child: Column(
            crossAxisAlignment: CrossAxisAlignment.start,
            children: [
              Text(
                "PLAY * FUN",
                style: TextStyle(fontSize: 20, fontWeight: FontWeight.bold),
              ),
              Container(
                  color: Colors.blue,
                  margin: EdgeInsets.only(top: 20),
                  child: ListView.builder(
                      itemCount: productList.length,
                      shrinkWrap: true,
                      itemBuilder: (BuildContext context, int index) {
                        return Container(
                          margin: EdgeInsets.only(top: 20),
                          color: Colors.yellow,
                          width: 400,
                          height: 200,
                        );
                      })),
            ],
          ),
        )
이제 상품을 구현해보자
좌측에 이미지를 넣고 우측에 텍스트를 넣을 container를 row를 활용해 구현해보자
이 row를 감쌀 container에 패딩을 20 적용시켜 너무 붙지 않도록하자
이미지는 데이터의 index값을 활용하고
데이터가 제공하는 imageUrl 정보를 활용하여 Image.network("url") 이렇게 구현하면 이미지가 그려진다.
그리고 이미지의 너비는 150을 주자.

오른편에는 초록색 컨테이너를 넣어주고 나머지 전체 영역을 expanded를 활용해 잡아주도록 하자.

body: Container(
          margin: EdgeInsets.all(20),
          color: Colors.red,
          child: Column(
            crossAxisAlignment: CrossAxisAlignment.start,
            children: [
              Text(
                "PLAY * FUN",
                style: TextStyle(fontSize: 20, fontWeight: FontWeight.bold),
              ),
              Container(
                  color: Colors.blue,
                  margin: EdgeInsets.only(top: 20),
                  child: ListView.builder(
                      itemCount: productList.length,
                      shrinkWrap: true,
                      itemBuilder: (BuildContext context, int index) {
                        return Container(
                            margin: EdgeInsets.only(top: 20),
                            color: Colors.yellow,
                            width: 400,
                            height: 200,
                            padding: EdgeInsets.all(20),
                            child: Row(
                              children: [
                                Image.network(
                                  productList[index].imageUrl,
                                  width: 150,
                                ),
                                Expanded(
                                  child: Container(
                                    color: Colors.green,
                                  ),
                                )
                              ],
                            ));
                      })),
            ],
          ),
        )
이제 마지막으로 녹색 컨테이너안에 텍스트들을 넣어주자
너무 붙지 않도록 컨테이너에 padding을 10 넣어주고
그 안에 타이틀 과 설명1, 설명 2를 넣어준 다음 (이것 역시 listview의 index값을 활용하면 된다.)
Column의 속성을 활용해 텍스트들이 좌측으로 붙도록 해주자.
각각의 텍스트들에 스타일을 넣어주고(색깔, 크기,bold)
너무 붙지 않도록 텍스트들에 top margin을 넣어주자.

 body: Container(
          margin: EdgeInsets.all(20),
          color: Colors.red,
          child: Column(
            crossAxisAlignment: CrossAxisAlignment.start,
            children: [
              Text(
                "PLAY * FUN",
                style: TextStyle(fontSize: 20, fontWeight: FontWeight.bold),
              ),
              Container(
                  color: Colors.blue,
                  margin: EdgeInsets.only(top: 20),
                  child: ListView.builder(
                      itemCount: productList.length,
                      shrinkWrap: true,
                      itemBuilder: (BuildContext context, int index) {
                        return Container(
                            margin: EdgeInsets.only(top: 20),
                            color: Colors.yellow,
                            width: 400,
                            height: 200,
                            padding: EdgeInsets.all(20),
                            child: Row(
                              children: [
                                Image.network(
                                  productList[index].imageUrl,
                                  width: 150,
                                ),
                                Expanded(
                                  child: Container(
                                    color: Colors.green,
                                    padding: EdgeInsets.all(10),
                                    child: Column(
                                      crossAxisAlignment:
                                          CrossAxisAlignment.start,
                                      children: [
                                        Container(
                                          margin: EdgeInsets.only(top: 10),
                                          child: Text(
                                            productList[index].title,
                                            style: TextStyle(
                                                fontSize: 16,
                                                color: Colors.blue,
                                                fontWeight: FontWeight.bold),
                                          ),
                                        ),
                                        Container(
                                          margin: EdgeInsets.only(top: 10),
                                          child: Text(
                                            productList[index].desc1,
                                            style: TextStyle(
                                                fontSize: 16,
                                                fontWeight: FontWeight.bold),
                                          ),
                                        ),
                                        Container(
                                          margin: EdgeInsets.only(top: 10),
                                          child: Text(
                                            productList[index].desc2,
                                            style: TextStyle(fontSize: 16),
                                          ),
                                        ),
                                      ],
                                    ),
                                  ),
                                )
                              ],
                            ));
                      })),
            ],
          ),
        )
마지막으로 컨테이너들의 색깔을들 모두 제거해주자

